
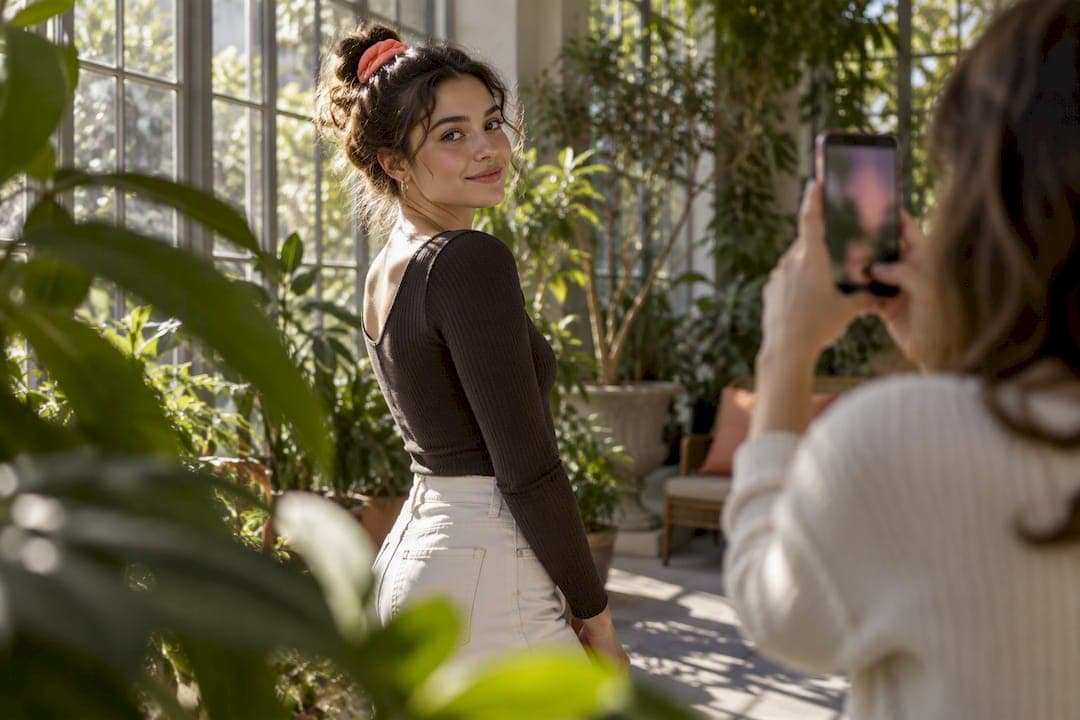
Yes, portrait mode can make your dating lead photo stronger, but only when you've already nailed the basics. It softly blurs the background so your face pops on a tiny app thumbnail, but it can't fix bad light, a warped close-up angle, or a forced smile. Get the fundamentals right first, then let portrait mode do its job.
TL;DR:
- Portrait mode enhances your face by softening the background but struggles with fine details and artefacts, especially in low light or busy backgrounds.
- Achieving flattering photos depends primarily on good lighting, proper camera distance using telephoto lenses, and natural, genuine expressions.
- Proper framing involves eye-level angles, head-and-shoulders crops, and multiple shots with different outfits and expressions to select the best image.
- Background and props should remain simple and natural, with environmental depth and limited accessories to avoid staged appearances.
- Picking the best photo requires clarity, authentic expression, consistency, and thumbnail visibility, with objective feedback tools helping to validate choices.
Table of Contents
- What portrait mode dating photos actually do (and where they go wrong)
- How to shoot flattering portrait-mode photos with a phone (step-by-step)
- Posing, expression and wardrobe that work for dating apps
- How to pick the best portrait-mode photos from your camera roll
- Common portrait-mode pitfalls and how to fix them in editing
- Phone-specific quick tips (iPhone and common Android patterns)
- Expert evidence and first-hand results from an AI photo coach
- How to use natural props and setting to your advantage
- The portrait-mode mistakes that ruin a shoot, and quick fixes on the spot
- A photographer's closing perspective on using portrait mode for dating profiles
- Get an honest second opinion on your photos
- Sources
- FAQ
What portrait mode dating photos actually do (and where they go wrong)
Portrait mode doesn't use a real camera lens to blur your background. It's software. Your phone takes depth information, works out what's "you" and what's "background," then fakes the soft blur you'd get from an expensive camera with a wide aperture. On a dating app, where your photo gets judged in about half a second on a screen the size of a stamp, that separation matters. A blurred background pushes the eye straight to your face, which is exactly where you want it.
That's the upside. Here's where it falls apart.
Software bokeh guesses. It doesn't know your hair from a cluttered hedge behind you, or your glasses frame from thin air. When it guesses wrong, you get haloing (a faint blurry ring around your outline), patchy blur around loose hair strands, and sometimes a weirdly sharp sliver where your glasses should fade into the background. On a full-size photo you might not notice. Zoomed to a matchmaking thumbnail, it can look like a bad Photoshop job.
None of that means skip portrait mode. It means don't lean on it to rescue a photo that was never going to work anyway.
- Portrait mode centres attention on your face by softening whatever's behind you.
- Software bokeh struggles most with fine detail: flyaway hair, wire-frame glasses, patterned backgrounds.
- Artefacts get worse in low light, because the phone has less depth data to work with.
- The strongest portraits still come from good light and the right distance, not the blur slider.
Photographers who shoot dating profiles for a living tend to agree on something simple: light, angle, and expression are the three variables that actually decide whether a photo works, and everything else is secondary to those three. Portrait mode sits firmly in the "everything else" category. It's a finishing touch, not a fix.
Pro Tip: If your portrait-mode shot has a strange halo around your shoulders or hair, don't reach for an editing app. Retake it two steps further back with more even light. Software fixes rarely beat a proper reshoot.
Phone-based portrait mode can also brighten your face slightly and mimic a more polished, studio-lit look in tricky conditions, which explains why it can rescue a so-so setup. But it's a boost, not a substitute for good lighting. Think of it as icing. You still need to bake the cake.
How to shoot flattering portrait-mode photos with a phone (step-by-step)
This is the order that actually matters. Skip a step and portrait mode won't save you.
1. Sort your light before you touch the camera
Soft, even light is the cheapest upgrade available to anyone with a phone. Stand near a window with the light coming from the side or slightly in front of you, not directly behind. Overcast days outdoors work brilliantly for the same reason: clouds act like a giant diffuser. If you're shooting outside on a sunny day, move into open shade, under a tree or awning, rather than standing in direct sun.
Avoid harsh midday sun altogether unless you genuinely know how to expose for it. It creates hard shadows under your eyes and nose, and most phone cameras will either blow out the highlights or crush the shadows trying to compensate. Photographers who specialise in this exact problem consistently point to soft window or open-shade light as the single easiest way to look more polished without spending a penny.
2. Step back and use your telephoto lens
This is the step almost everyone skips, and it's the one that makes the biggest visual difference. Wide-angle lenses (which is what your front camera and the main rear lens usually are) distort faces up close. Noses get bigger. Foreheads stretch. It's not your face; it's the lens.
If your phone has a telephoto lens, most flagship phones from the last few years do, switch to it and physically step back a couple of metres rather than digitally zooming in. A longer focal length compresses facial features naturally, which is why professional headshots are almost never shot on a wide lens at arm's length. On an iPhone 14 Pro, for instance, the telephoto lens sits around 77mm equivalent, roughly the focal length photographers have used for flattering portraits for decades.
Never use digital zoom. It just crops and stretches the wide lens image, which makes everything worse, not better.
3. Set portrait mode up properly before you shoot
Once your light and distance are sorted, open portrait mode and do three things:
- Tap to focus directly on your eyes. Most phones will lock focus and exposure on whatever you tap, and eyes are the part of your face that needs to be sharpest.
- Lock your exposure if your phone allows it. This stops the camera hunting and changing brightness between shots, especially useful if you're using a timer or a friend is taking multiple frames.
- Check your depth or blur intensity. Most phones let you adjust how strong the background blur is, either before or after the shot. Dial it down from the default. A little blur looks natural. A lot looks like a green-screen job.
4. Frame it properly
Shoot at eye level, not from above or below. A camera held higher than your eyeline shrinks your body and can look condescending; held too low, it exaggerates your chin and nostrils. Neither flatters anyone.
For your lead photo, aim for a head-and-shoulders crop with a bit of breathing room around you, not a tight crop that clips the top of your head or crowds your face against the edge of the frame. Leave enough space that the photo doesn't feel cramped when it's squeezed into a round thumbnail on a match screen.
Before you commit to any shot, zoom out on your phone screen and look at it small. What reads clearly at full size can turn into a blurry smudge at thumbnail size, which is genuinely how most people will see it first.
5. Shoot more than you think you need
Take multiple outfits if you're doing a proper session, and multiple expressions within each outfit. Genuine expressions are hard to fake on command, so the trick is volume: shoot 15 to 20 frames per setup rather than three, and let the best one emerge naturally rather than trying to force it in a single take.
Using a tripod, a stack of books, or a friend to hold the phone beats a stretched-arm selfie every time, partly because it lets you use the rear camera (which has better optics than the front-facing one) and partly because your arm isn't in the shot creating an awkward triangle of shadow.
Pro Tip: Ask whoever's holding the camera to chat to you between frames instead of counting down to "cheese." Candid reactions to a real conversation almost always beat a posed smile on command.
Posing, expression and wardrobe that work for dating apps
A genuine smile is the single hardest thing to fake and the easiest thing to spot when it's fake. The difference between a polite smile and a real one usually shows in the eyes, not the mouth. Photographers get around this by not asking for a smile at all. Instead, try prompts like recalling a genuinely funny memory, or having whoever's shooting ask you an unexpected question right before the shutter clicks. The reaction, not the pose, is what reads as authentic.
Body position matters more than most people realise. Squaring your shoulders directly at the camera tends to look stiff and confrontational. Turning your torso about a quarter turn away from the lens while keeping your face toward it, the classic three-quarter angle, reads as relaxed and slims the frame slightly without looking like you're trying to.
Hands are the other thing people forget about entirely. Crossed arms read as closed off or defensive, which is the opposite of what you want a first photo to communicate. Instead, give your hands something natural to do: rest one in a pocket, hold a drink, lean lightly on a rail or wall. Anything beats stiff arms glued to your sides.
On wardrobe, the rule is simpler than most style guides make it sound:
- Solid colours in mid-tones (navy, burgundy, olive, warm grey) photograph better than busy patterns, which can visually compete with your face for attention.
- Fitted clothing reads as more put-together than baggy layers, especially in a headshot where fabric bulk near the shoulders can make the frame feel cluttered.
- Skip sunglasses entirely for your lead photos. They hide your eyes, and eye contact is a big part of how approachable you look in a photo, whereas sunglasses signal a kind of distance most people read, consciously or not, as guarded. If you love a good pair of shades for everyday wear, that's a separate style choice worth getting right for photos where your eyes aren't the point.
- Avoid clashing prints or logos that pull focus away from your face.
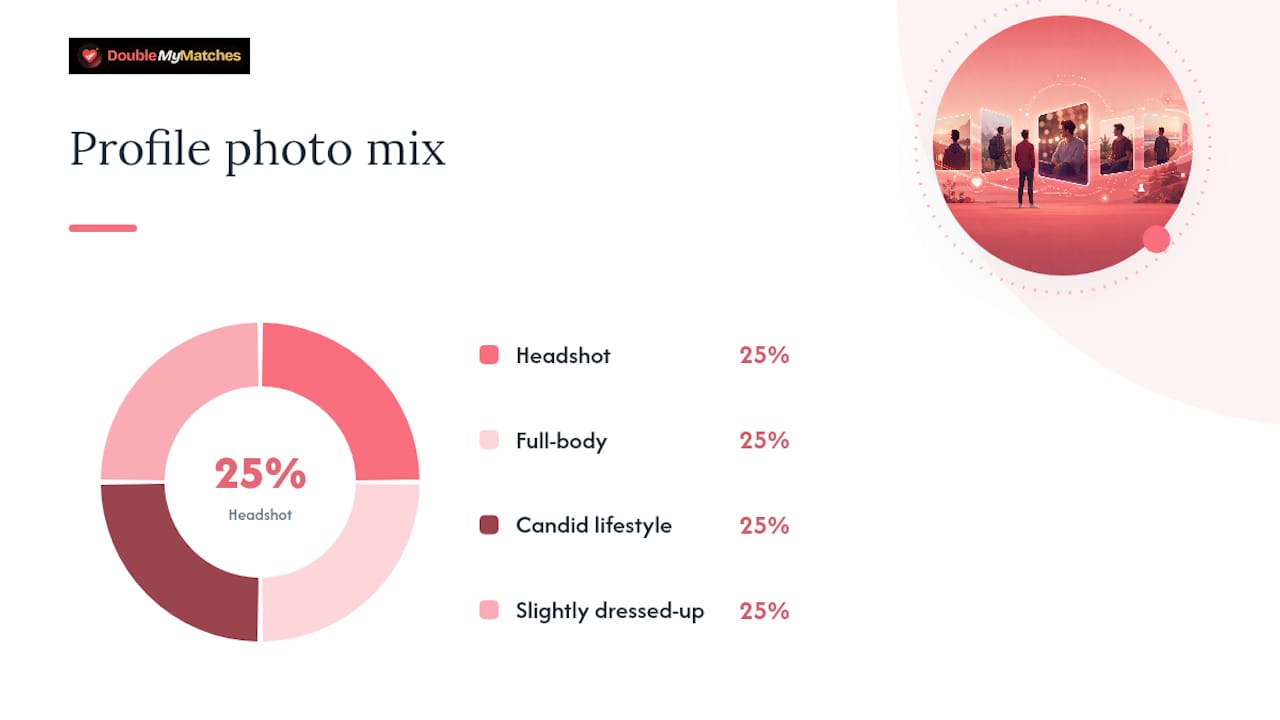
Beyond the lead shot, plan for a small set rather than one perfect frame. Dating advice consistently recommends a mix across your lineup: one clear headshot, one full-body shot so people know roughly what you look like, a candid lifestyle photo doing something you enjoy, and one slightly dressed-up shot for contrast. Variety does more for your profile than five near-identical selfies ever will, and it's worth learning which camera angles suit your face shape before you shoot each one.
How to pick the best portrait-mode photos from your camera roll
Shooting the photos is only half the job. Most people undersell themselves by picking the wrong frame from a perfectly good set, so run every shortlist through the same checklist before you upload anything.
- Clarity and face visibility first. Is your face sharp, well lit, and unobstructed by shadow, hair, or a badly placed blur edge? Reject anything soft around the eyes immediately, no matter how good the rest of the shot looks.
- Expression and approachability second. Does the photo look like you're mid-moment, rather than posed for a passport? Genuine warmth in the eyes beats a technically perfect but flat expression every time.
- Consistency across your set third. Do your chosen photos look like the same person taken within a reasonable window of time? A gym selfie from three years ago next to a formal shot from last month creates doubt, not intrigue.
- The thumbnail test, always last. Shrink the image down to roughly the size it'll appear on a match card. If your face or expression gets lost at that size, it doesn't matter how good it looks full screen.
Once you've got a shortlist, don't rely purely on your own judgement. You're too close to your own face to be objective about it, everyone is. A quick blind test with two or three friends, simply asking "which one would you swipe on if you didn't know me," gives you a useful outside read. Informal polls in a group chat work the same way, and they're free.
If you want something more structured than a friend's gut reaction, a simple scoring rubric helps take the guesswork out of it. Score each candidate photo out of five on:
- Face clarity — sharp, unobstructed, well exposed
- Eyes — open, engaged, ideally making some connection with the camera
- Expression — genuine warmth versus posed stiffness
- Lighting — even, flattering, no harsh shadows
- Background — clean, uncluttered, doesn't compete with your face
Add the scores, and whichever photo tops the table becomes your lead image. It sounds almost too simple, but forcing yourself to score each category separately stops one strong feature (a great outfit, say) from masking a weak one (bad lighting) in your overall gut impression. A proper step-by-step selection process makes this even more repeatable if you're building a whole new lineup rather than swapping one photo.
Common portrait-mode pitfalls and how to fix them in editing
Three problems show up again and again in portrait-mode shots, and they all have different fixes.
Haloing around your outline. This is the faint, glowing edge where the software's mask doesn't perfectly match your silhouette. It's most visible against busy or high-contrast backgrounds. A small amount is invisible at thumbnail size and not worth fixing. A large amount usually can't be edited out convincingly, so it's a reshoot problem, not an editing one.
Edge artefacts around hair and glasses. Fine detail is where software bokeh struggles most. Loose hair strands can get partially blurred while the rest stays sharp, creating a slightly uncanny look, and glasses frames sometimes get an odd halo where the lens meets the arm. Moving to a plainer background and slightly stronger, more even light both reduce this before you even take the shot.
Over-smoothed or over-edited skin. This one isn't a portrait-mode problem specifically, but it compounds badly with one, because the software blur plus heavy skin smoothing together can make a face look almost artificial. Keep edits minimal: small exposure and contrast tweaks are fine, but skip aggressive skin smoothing, heavy filters, and any preset LUT that shifts your skin tone noticeably from reality.
If you're editing after the fact, adjust these sparingly:
- Exposure and contrast: small nudges only, enough to correct, not to transform.
- Saturation: leave close to neutral. Oversaturated skin tones read as fake almost instantly.
- Bokeh intensity: many phones let you reduce the blur after shooting. If in doubt, dial it down.
- Skin smoothing: avoid it altogether, or use it at the lowest possible setting.
Pro Tip: If you're staring at a photo wondering whether to spend twenty minutes fixing it in an editing app, that's usually your answer that it needs a reshoot instead. Bad masking around hair, lost background context, or soft focus on the eyes are all things editing genuinely can't fix.
Phone-specific quick tips (iPhone and common Android patterns)
On iPhone, use the telephoto lens whenever your model has one; it's a meaningfully better portrait lens than the main wide camera. Pull the depth intensity slider down from the default in the portrait settings, since Apple's software tends to apply a fairly strong blur by default. If you're taking multiple frames of the same pose, shoot in Live Photo mode. It captures a second or two either side of the shutter press, which means you can scroll through and grab the exact frame where your expression looks most natural, rather than being stuck with whatever the shutter caught.
On Android, the naming and location of portrait mode varies more between brands than on iPhone, so check your camera app's mode carousel for "Portrait," "Live Focus," or similar before assuming your phone doesn't have it; nearly all mid-range and flagship models from the last few years do. Front-facing cameras on most Android phones are wider-angle than the rear cameras, which makes them worse for close-up portraits specifically. Where possible, avoid the front camera entirely for your final lead shot.
The rule that holds across every brand: the rear camera almost always beats the front camera for a serious dating photo, both in resolution and lens quality. Use a tripod, a stack of books, a timer, or a friend rather than defaulting to a front-camera selfie because it's convenient. Convenient and flattering aren't always the same thing.
Expert evidence and first-hand results from an AI photo coach
Photographers judge a portrait on the same handful of things every time: is the light doing your face favours, does the expression look genuine, and is the composition drawing the eye where it should go. That's essentially what DoubleMyMatches checks too, just run through AI scoring instead of a human eye.
The tool analyses your uploaded photos and ranks them from strongest to weakest for lighting, expression, and composition, the exact three variables photographers already treat as decisive. It then maps that directly onto the kind of selection checklist covered earlier in this article: which photo has the clearest face, the most genuine expression, the cleanest background.
Photos can be scored on criteria similar to those a photographer might consider: lighting, expression, and composition, then ranked from strongest to weakest.
Users can gain confidence by understanding clearly why one photo may outperform another rather than guessing. Being told "this one has a stronger expression and cleaner background" is a lot more actionable than a vague feeling that one photo is "better."
- Photos can be ranked from strongest to weakest rather than scored in isolation. Specific feedback per photo can help identify what to fix. Some photos that may harm match chances can be flagged. Feedback may be tailored by factors such as gender and app differences. Images are analyzed temporarily and deleted after use without being published or used for AI training. Retesting after changes can help check if improvements were made.
How to use natural props and setting to your advantage
The environment around you does real work in a portrait, provided it stays in the background rather than fighting for attention. A doorway, a stretch of exposed brick, foliage, or a plain wall all give portrait mode's blur something clean to work with, which reduces the odds of the haloing and edge artefacts covered earlier.
Props work the same way, in moderation. Holding a coffee cup, a book, or standing near a bike you actually ride gives your hands something natural to do and adds a small hint of personality without turning the photo into a still life. The trick is restraint: one prop, used naturally, reads as authentic. Three props and a busy setting reads as staged.
Outdoor settings with depth, a tree-lined path, a stretch of coastline, a market street, give portrait mode more distance between you and the background to work with, which generally produces a cleaner blur than a shot taken a metre from a flat wall. If you're leaning on a favourite hobby for a supporting photo in your lineup (climbing, cooking, a dog, a guitar), let the environment stay soft and out of focus rather than trying to showcase it in sharp detail. Your face is still the subject; the setting is just context.
The portrait-mode mistakes that ruin a shoot, and quick fixes on the spot
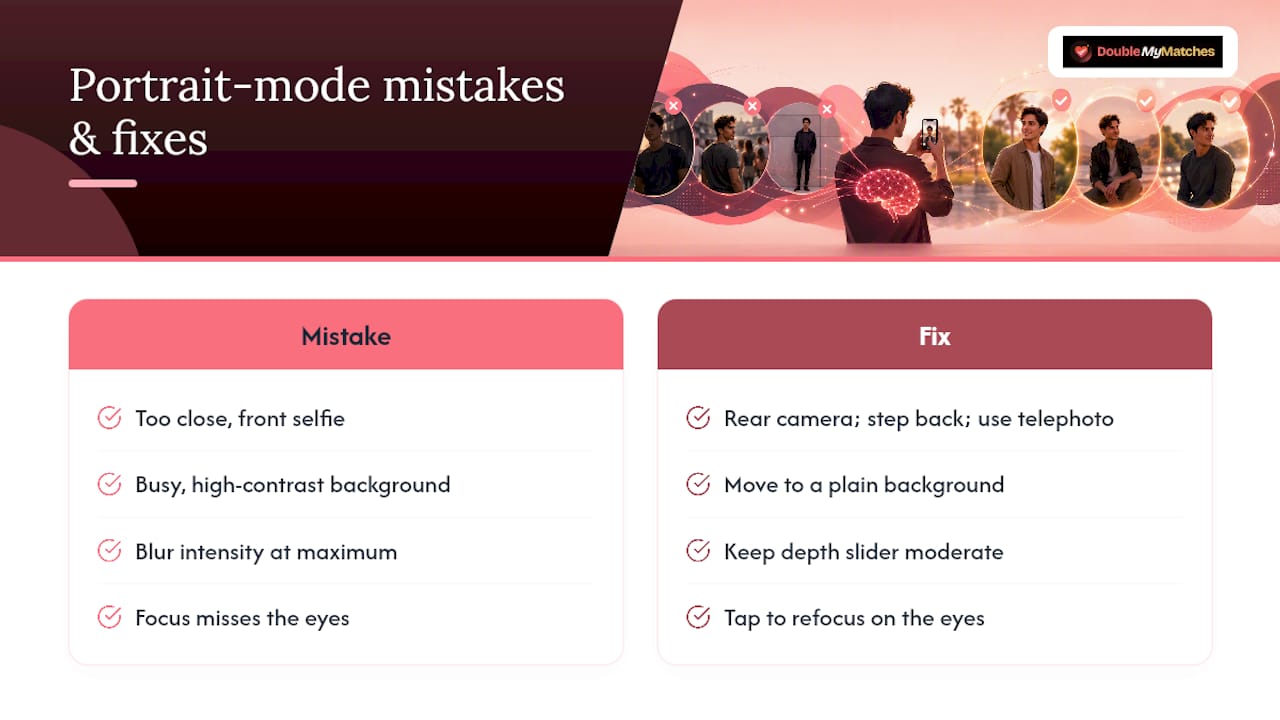
The most common portrait-mode mistake is shooting too close with the wrong lens, usually a front-camera selfie at arm's length. The fix takes ten seconds: switch to the rear camera, step back two or three metres, and use the telephoto lens if your phone has one.
The second most common mistake is shooting against a busy or high-contrast background, foliage, a patterned wall, a crowd, which is exactly where software bokeh produces the worst haloing and edge errors. If you notice odd blur artefacts on the preview screen before you shoot, that's your cue to reposition against something plainer, not to fix it later.
The third is cranking the blur intensity to maximum, thinking stronger equals more professional. It usually has the opposite effect, making the photo look artificially separated from its background rather than naturally composed. Check the depth slider before you shoot and keep it moderate.
Last, and easiest to fix mid-shoot: check focus on the eyes, not the nose or the background, before every single frame. A soft face with a sharp background blur is one of the most jarring portrait-mode failures, and it's entirely preventable by tapping to refocus each time you change position.
A photographer's closing perspective on using portrait mode for dating profiles
Portrait mode is a genuinely useful tool that gets asked to do too much. Used after you've sorted your lighting, distance, and expression, it adds real polish, the kind of soft, professional-looking separation between you and your background that used to require a proper camera and a wide-aperture lens. Used instead of those fundamentals, it just produces a blurry background around a badly lit, badly angled photo. The blur was never going to be the thing carrying the shot.
If you're editing a portrait-mode photo and finding yourself fighting haloing, a soft face, or a lost background, that's the signal to reshoot, not to keep tweaking sliders. A ten-minute reshoot with better light almost always beats twenty minutes of editing trying to rescue a flawed frame.
As for whether to book a professional session: DIY works fine for most people who follow the fundamentals, but a professional session is worth the cost if you've tried several DIY attempts and nothing's landing, or if you want a guaranteed strong lead photo for a specific relaunch. A photographer's main advantage isn't better equipment. It's getting your genuine expression on demand, which is the hardest thing to direct yourself into on a self-timer.
— The Team @ DoubleMyMatches
Get an honest second opinion on your photos
DoubleMyMatches gives you what a friend's opinion can't: an objective, app-aware read on exactly which of your photos is helping you and which one is quietly working against you. Instead of guessing whether your new portrait-mode shot actually beats your old lead photo, you upload both and see them ranked side by side on lighting, expression, and composition, then get straight feedback on the changes to make.
The Full Report costs $7 as a one-off payment and ranks your full set from strongest to weakest, with feedback tailored to your gender and the app you're using. Reshot a photo based on that feedback? The Retest & Lock In option, $17 one-off, lets you check whether the new version actually moved you up the ranking before you commit to it as your lead image. If you're planning to update your profile regularly, the 12-Month Pass covers ongoing checks; pricing for that plan is available on the site.
Every photo you upload is analysed and then deleted. Nothing is published, and nothing trains the model on your face. If you want to run a quick check on a single new photo first, try the profile picture tester and see where it lands.
Sources
For deeper technical grounding on focal length, distortion, and lens choice, Nikita Sokolsky's guide to dating photos and the Photography Shark Studios photographer's guide both cover the mechanics in more depth than a single article can.
- How to take a perfect dating photo - by Nikita Sokolsky
- How to Take Good Dating Profile Pictures: A Photographer's Guide | Photography Shark Studios
- How to take a perfect dating app photo — GQ South Africa excerpt
- Dating profile pictures – How to pick the right ones | eHarmony
FAQ
What kind of dating profile picture is most attractive?
A clear, well-lit head-and-shoulders shot with genuine eye contact and a natural smile consistently performs best. Photographers rank light, angle, and expression as the three factors that matter most, ahead of filters, backgrounds, or camera settings.
What is a red flag in online dating photos?
Sunglasses or hats in every photo are a common red flag, because they block eye contact and make you look guarded rather than approachable, an effect confirmed by dating photo advice. Group shots as a lead photo and heavily filtered or outdated images raise similar doubts, since matches can't tell which person in the group is you or whether the photo reflects how you look now.
What pictures do most people respond well to on dating apps?
A photo mix that shows your face clearly, your personality through a hobby or setting, and your general appearance through a full-body shot tends to get the strongest response. Dating-advice guidance recommends combining a clear headshot with a full-body image, a candid lifestyle shot, and a dressed-up photo for variety.
What are the best pictures to use for a dating profile?
The best lineup includes one strong lead headshot, one full-body photo, one candid activity or hobby shot, and one dressed-up image, each showing a genuine expression and consistent appearance. If you're unsure which of your existing photos hits that bar, running them through a dating profile photo rater gives you a ranked answer rather than a guess.
Does portrait mode work well for dating app photos?
Yes, provided you fix your lighting, camera distance, and expression first, since portrait mode only blurs the background and can't correct a badly lit or badly angled shot. Keep the blur intensity moderate and check for edge artefacts around hair or glasses before choosing it as your lead photo.